How to change git commit author

Changing git author
There are 3 ways to change the committer data in Git. All of these methods only affect future commits, not past ones.
Change author data globally
You can run the git config command with the --global flag. This will make sure all of your future commits use the given information:
git config --global user.name "John Doe"
git config --global user.email "john@doe.com"
Change author per repository
If you want to use different author data in a certain repository, you can simply omit the --global flag. This affects only the repository you're currently in.
git config user.name "John Doe"
git config user.email "john@doe.com"
Change author just for the next commit
You also can change the author only for one commit using --author flag in the git commit command
git commit --author="John Doe <john@doe.com>" -m "my commit message"
Editing the author of past commits
Editing past commits (no matter how exactly) means that we'll be rewriting commit history. This is something that can create issues for your collaborators because you'll create new commit objects when they might have already created new work based on some of the original commits.
There are a few ways to edit past commits.
Using --amend for the very last commit
This is common use case - you want to change something in the last commit you've done, you reach for git commit --amend.
This works for the commit author as well, just pass another option --author to change the author of the last commit.
git commit --amend --author="John Doe <john@doe.com>"
This replaces the last commit with the edited one.
Using interactive rebase
Interactive rebase is the swiss army knife of Git. It lets you to do and change almost everything. It is a very powerful tool, which means you can very easily shoot yourself in the foot with it. Use it with care (and possibly read up on it)!
With great power comes great responsibility [[1]]
~ Uncle Ben
[[1]]: https://knowyourmeme.com/memes/with-great-power-comes-great-responsibility
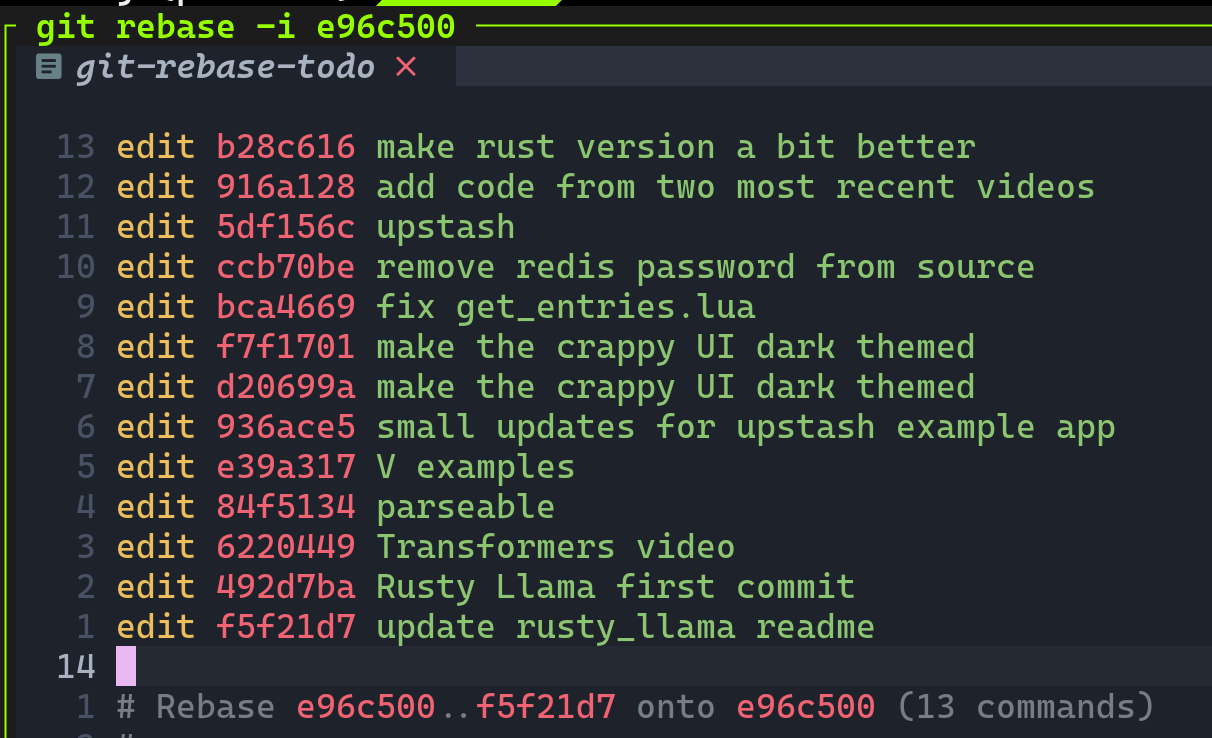
The first step is to identify the last "good" commit and provide its hash to the rebase command
git rebase -i e96c500
Your editor will open, requesting to mark all the commits you want to change with the edit keyword.
Git will now walk through each commit, giving you a chance to mold it as you want:
Stopped at b28c616...  make rust version a bit better
You can amend the commit now, with

  git commit --amend '-S'

Once you are satisfied with your changes, run

  git rebase --continue
You can now correct the author data and then continue to the next selected commit object until you've edited all the commits marked.
git commit --amend --author="John Doe <john@doe.com>" --no-edit
git rebase --continue
--no-edit flagYou can wonder what the
--no-edit means in the comment above. Isn't the editing commit what we want after all? The semantic of no-edit here are a bit different than one may thing.The
--no-edit flag tells git to not open your editor to change the commit message. We basically tell Git "everything is fine, I don't need to change anything manually in the message".Using rebase with --exec
Alternative approach is using the git rebase with --exec option. This option allows to specify command that needs to be run on after each commit. If the command is the same for every commit, this can speed up the process as we don't need to enter the same command every commit manually and continuing with the rebase.
git rebase e96c500 --exec 'git commit --amend --author="John Doe <john@doe.com>" --no-edit'
-i option in the command above - the rebase is no longer interactive. The process goes through each commit from the specified root commit to the HEAD of the branch.It is because it's considered a "good" commit.
Using git-filter-repo
There is also an external tool to the git toolkit named git-filter-repo which allows you to rewrite history of your repositories, including the author data.
It is a replacement for git filter-branch (which is built-in into Git, but has a lot of pitfalls [[2]]).
[[2]]: Even Git documentation recommends using git-filter-repo instead of git filter-branch - https://git-scm.com/docs/git-filter-branch#_warning
Install git-filter-repo
Git filter-repo requires at least Git version 2.22.0, which you can verify with the following command:
git --version
You have to install git filter-repo using your system’s software package management system:
- Ubuntu
sudo apt install git-filter-repo
- MacOS
brew install git-filter-repo
- Fedora
sudo yum install git-filter-repo
For other systems, follow the installation guide here.
Create a mailmap file
Git filter-repo uses a mailmap file to update commit author information.
Create this file in the parent directory outside your repository.
vim mailmap
And add the following information to the mailmap file:
John Doe <john@doe.com> <old@email.com>
This will change the name to John Doe and email to john@doe.com of the author of all commits made by the author with old@email.com email address.
Edit commit authors
When you’re ready, switch to the repository you want to edit and run the git filter-repo command.
cd your-project
git filter-repo --mailmap ../mailmap
The --mailmap argument accepts the path to the mailmap file you created earlier.